Goshawk – Non-Normal Flight Modes

The autopilot has a limited error checking function, running on the secondary PPM encoder processor, which is designed to:

  • Detect complete loss of RC signal (if the RC receiver is able to generate a predictable signal-loss behaviour) and initiate a defined auto-mode response, such as returning to home. (Only some RC equipment is capable of this.)

The autopilot error checking cannot:

  • Detect if one more individual RC channel has failed or become disconnected
  • Detect if you’re flying too far away or are about to hit the ground
  • Detect autopilot hardware failures, such as low-power brownouts or in-air reboots
  • Detect if the autopilot software is not operating correctly
  • Detect other problems with the aircraft, such as motor failures.
  • Otherwise stop you from making setup or flight mistakes

Setting up Non-Normal Flight Modes

There are five completely different non-normal flight modes. In the order prioritised by the autopilot, these modes are:

From most important to least important;

  • Critical Battery
  • RC and C2 Link (equal priority)
  • GNSS
  • Geofence

Critical Battery

The autopilot is fitted with a voltage and current sensor. Therefore, the autopilot is able to monitor the battery voltages and calculate the percentage of the battery capacity used. This enables the autopilot to activate the battery failsafe routine.

The battery non-normal is triggered when the flight battery voltage drops below a predefined critical voltage or the battery capacity used exceeds the warning capacity.

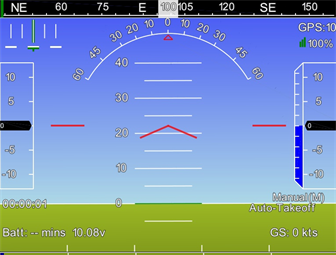
When the non-normal is triggered, the autopilot sends a message to Neuron GCS via the telemetry link. Neuron GCS will then display the advisory “Low Battery” on the PFD. An audio advisory will also be given. It will trigger the autopilot to go RTL flight mode.

RC Link

Your RC transmitter outputs a PWM signal that is captured by your receiver and relayed to the autopilot. Each channel on your transmitter has a PWM range usually between 1100 – 1900 with 1500 being its neutral position. When you start your radio calibration on Neuron GCS, all your values will be at 1500. By moving your sticks, knobs and switches you will set your PWM range for each channel. The autopilot monitors your throttle channel and if notices a drop lower than FS_THR_VALUE (Default is 950) it will trigger the non-normal mode.

RC transmitters usually have a default range for each channel that goes from -100% to 100%, however most transmitters will allow you to extend this to -150% and 150% respectively. In the default setup, bringing your throttle to -100% will translate to a value close to 1100 and bringing it to -150% will translate to a value closer to 900. What we want to achieve is to let your receiver know that the throttle can go as low as -150% but keep the autopilot control range between -100% and 100%. Meaning that when flying, our throttle values will range between 1100 – 1900.

  • If we lose RC communication, the receiver if set up properly, will drop to the lowest known throttle value of ~900. This value falls below the FS_THR_VALUE and will trigger the autopilot to go into a non-normal mode if the throttle failsafe parameter (FS_THR_ENABLE) is enabled.
  • The aircraft will switch to RTL mode and then land at the launch position.

C2 Link

When flying in NAV mode, the autopilot is triggered into the non-normal mode if it loses the command and control (C2) link. In the event that the autopilot stops receiving MAVlink (telemetry protocol) heartbeat messages for more than 10 sec, the GCS non-normal (FS_GCS_ENABLE, 0=Disabled, 1=Enabled) will trigger the autopilot to change the flight mode to RTLNote: This non-normal will not trigger in UNAS/FBW A mode.

GNSS

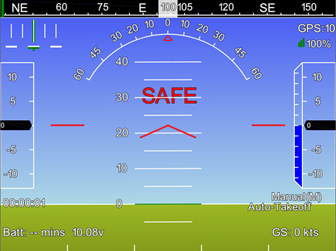
The aircraft uses a GNSS satellite receiver to locate the aircraft laterally. In the event that the GNSS system fails or insufficient satellites are in view, the autopilot will send a message to Neuron GCS. Neuron GCS will then display the warning “GPS Lost” on the PFD. If the aircraft is in NAV mode, the aircraft will attempt to navigate using its inertial sensors.

Geofence Non-Normal

A GeoFence is an imaginary boundary that can be set up to enclose a flight area. Picture a GeoFence as a fence around a property, but with one difference – it also has a floor and a ceiling! The concept is simple – while the aircraft remains completely within the GeoFence, all is well, and the mission will proceed as normal. Should however – for ANY reason – the aircraft ‘touch’ the GeoFence, the aircraft will automatically switch to NAV mode, and fly back to the GeoFence Return Point. Once at the return point the aircraft will loiter at that point awaiting the next command. This loiter is indefinite, until the next command is received.

Refer to the appropriate Neuron GCS manual for information regarding the configuration and use of a Geofence.
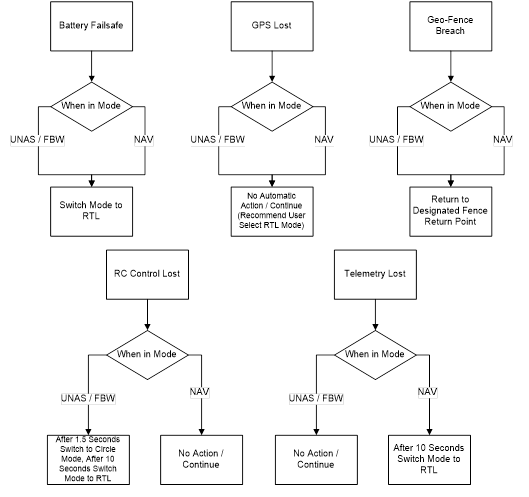
Process Flow

The Flowchart of the failsafes are included below. No one procedure overrides the other, and will take action on the most recent event.

Goshawk – Flight Modes

It is now necessary to set up the UNAS/FBW-A/NAV switches functionality for the system. This utilises the following THREE switches on the transmitter. Switch on the transmitter.

Figure 17, Flight Mode Selector Switch

Flight Mode Descriptions

MODEANNUNCIATIONDESCRIPTIONYELLOW SWITCHBLUE SWITCH
UnassistedUNASRegular RC control, no stabilization. All RC inputs are passed through to the outputs.  UNAS (towards user)No dependency. Operation preference is NAV OFF
Fly-By-Wire AFBWAThis is the most popular mode for assisted flying in fixed wing, and is the best mode for inexperienced flyers. In this mode the aircraft will hold the roll and pitch specified by the control sticks. If the aileron stick is held hard right then the aircraft will hold its pitch level and will bank right by the maximum bank angle. It is not possible to roll the plane past the maximum bank angle, and it is not possible to pitch the plane beyond the maximum pitch angles. Note that holding level pitch does not mean the aircraft will hold altitude. How much altitude the aircraft gains or loses at a particular pitch depends on its airspeed, which is primarily controlled by throttle. To gain altitude the throttle should be raised, and to lose altitude the throttle should be lowered.FBW (middle selection or away from user)NAV Off
Navigation Mode  NAVGNSS coupled to autopilot to command flight path laterally and vertically according to active flight plan.FBW (AWAY from user) (Switch cannot be in the middle position.)NAV ON
Return To Launch (Selected from GCS)RTL (Selected from GCS)When RTL mode is selected, the aircraft will return to the home location. The vehicle will climb to a specified height if operating below, otherwise it will maintain current height. Once arrived at the home position the vehicle will circle around the Home position indefinitely. . (Selected from GCS) (Selected from GCS)
Table 1, Fixed Wing Flight Modes

Goshawk – Aircraft Configuration

Aircraft Assembly

Wings

Insert the carbon wing spar into the main body of the aircraft. Push one onto the carbon tube until the tube presses against the end inside the wing. Push the wing back into the fuselage, keying the connectors and locking pins. Ensure a tight fit.

Gripping the already installed wing, locate the remaining wing onto the carbon rod and push until the connectors lock.

Use a 2.5mm Hex driver to tighten the bolt ontop of the wing onto the wing spar.

Rudder

Place rudder on bottom pin hinge. Alight top of rudder with top pin hinge and insert pin. Attach rudder pushrod to control horn.

Figure 6 – Rudder

Horizontal Tail

Connect the MPX 6 pin connector inside the vertical tail to the horizontal tail.

Place the horizontal tail on top of the vertical tail and alight plastic lugs. Push horizontal tail aft until plastic plates are flush.

Using a 2.5mm Hex head key drive, insert the bolt holding the horizontal stabiliser to the vertical stabiliser.

Figure 7 – Tail Section

Control Horns

Check all control horns (located on all control surfaces) are connected to pushrods securely. Use fuel tubing if necessary.

Batteries

Attach batteries together by aligning them against the hook and loop Velcro on each battery. Insert into the aircraft (without connecting the XT60 or balance lead connectors) onto the Velcro pad.

Pitot

Ensure pitot tube is clear of obstructions and clean, and install pitot tube cover.

Figure 8 – Pitot Tube System

ONLY USE PITOT COVER SUPPLIED WITH THE FLIGHT KIT. THE USE OF ADHESIVE TAPE MAY CAUSE INACCURATE READINGS.

Video Antenna

If powering the video system, ensure the video antenna is installed. This is installed by default and located in the lower access hatch.

Centre of Gravity

The V-TOL GosHawk™ is a very light aircraft. The installation of equipment may significantly alter the tested C of G limits of the aircraft. Therefore all proposed fixed installations must be approved by V-TOL Aerospace Pty Ltd.

It is important to balance the aircraft so that the CG is very close to the correct location for the airframe. An incorrect CG will make the aircraft unstable during flight and could create hazardous conditions. The centre of gravity of the V-TOL GosHawk™ aircraft is located on the servo cable slot.

To Measure the C.O.G., hold the aircraft up using a fingertip at the centre of gravity (CG) location on each wing, checking to ensure that the aircraft maintains a level position. Next hold the aircraft up by the prop shaft and one finger on the centreline of the fuselage opposite the motor and ensure that the aircraft balances in a level position. If the aircraft does not balance correctly, shift the location of the batteries or add ballast weights to move the CG to the correct location.

Battery

Power Pack Charging

CharacteristicValue
TypeLithium Ion
Cell Configuration4 Series – 3 Parallel x 2
Voltage14.8 V Nominal
Discharge ConnectorXT60
Balance ConnectorJST-XH
Weight600 grams x 2
Dimensions108 x 36 x 65mm x 2
Discharge Rate20A Constant 40A Burst (10Sec)

YOU MUST READ THESE SAFETY INSTRUCTIONS, CAUTION AND WARNING BEFORE USING OR CHARGING BATTERIES.

LITHIUM BATTERIES ARE VOLATILE. FAILURE TO READ AND FOLLOW THESE INSTRUCTIONS MAY RESULT IN FIRE, PERSONAL INJURY AND DAMAGE TO PROPERTY IF CHARGED OR USED IMPROPERLY

Cautions

  • INFORMATION IN THIS DATA SHEET IS COMPILED USING THE OEM GUIDELINES
  • USE LITHIUM POLYMER SPECIFIC CHARGERS ONLY. DO NOT USE A NICKEL CADMIUM OR NICKEL METAL HYDRIDE CHARGER – FAILURE TO DO SO MAY CAUSE A FIRE, WHICH MAY RESULT IN PERSONAL INJURY AND PROPERTY DAMAGE.
  • NEVER CHARGE BATTERIES UNATTENDED. WHEN CHARGING LIPO BATTERIES YOU SHOULD ALWAYS REMAIN IN CONSTANT OBSERVATION TO MONITOR THE CHARGING PROCESS AND REACT TO POTENTIAL PROBLEMS THAT MAY OCCUR
  • SOME LIPO CHARGERS ON THE MARKET MAY HAVE TECHNICAL DEFICIENCIES THAT MAY CAUSE THEM TO CHARGE LIPO BATTERIES INCORRECTLY. IT IS SOLELY THE RESPONSIBILITY OF THE USER TO ASSURE THAT THE CHARGER USED WORKS PROPERLY.
  • IF AT ANY TIME YOU WITNESS A BATTERY STARTING TO BALLOON OR SWELL UP, DISCONTINUE THE CHARGING PROCESS IMMEDIATELY. DISCONNECT THE BATTERY AND PLACE IT IN A SAFE OBSERVATION AREA FOR APPROXIMATELY 15 MINUTES. CONTINUING TO CHARGE A BATTERY THAT HAS BEGUN TO SWELL WILL RESULT IN A FIRE.
  • BATTERY OBSERVATION SHOULD OCCUR IN A SAFE AREA OUTSIDE OF ANY BUILDING OR VEHICLE AND AWAY FROM ANY COMBUSTIBLE MATERIAL.
  • SHORTS CAN CAUSE FIRES! IF YOU ACCIDENTALLY SHORT THE WIRES THE BATTERY MUST BE PLACED IN A SAFE AREA FOR OBSERVATION FOR APPROXIMATELY 15 MINUTES. ADDITIONALLY, BE MINDFUL OF THE BURN DANGER THAT MAY OCCUR DUE TO A SHORT ACROSS JEWELLERY (SUCH AS RINGS ON YOUR FINGERS).
  • CHEMICAL REACTIONS ARE NOT INSTANTANEOUS; A BATTERY THAT HAS BEEN SHORTED MAY NOT IGNITE FOR 10 MINUTES.
  • ALL CRASH BATTERIES, EVEN IF NOT DEFORMED, SHOULD BE PLACED IN A SAFE AREA FOR OBSERVATION FOR AT LEAST 15 MINUTES.
  • IF FOR ANY REASON YOU NEED TO CUT THE TERMINAL WIRES, CUT EACH WIRE SEPARATELY, ENSURING THE WIRES DO NOT BECOME SHORTED ACROSS THE CUTTING TOOL
  • NEVER STORE OR CHARGE A BATTERY PACK INSIDE YOUR CAR IF THE INTERNAL TEMPERATURE WILL EXCEED 40 DEGREES CELSIUS.

Normal Charging

The charge rate should not exceed 0.5C (0.5 x the capacity of the battery, unless otherwise noted*). Higher setting may cause problems which can result in shortened battery life or fire.

For example: Charge a 10,000mAh battery at or below 5 Amps. Charge a 21,000mAh battery at or below 10.5Amps.

Li-Ion packs with balancing connectors must be used with balancers for safer charging.

To charge at greater than 0.5C (no more than 1C): You must use an approved charger in conjunction with a Balancer. Charging higher than 1C will reduce the cycle life.

To charge two packs in series: The packs need to first be charged individually and balancer used to ensure packs are matched.  Only matched packs may be charged in series.( If all the voltages are within 0.01V of each other)  Please note that this requires a “Y” cable be made to electrically attach the packs together in series and that the battery on the negative most side of this cable (the lead that goes to the negative terminal of the charger)

Storage and Transport

  • Store batteries at room temperature between 8 and 25 degrees °C for best results.
  • If storing longer than one week; batteries must be stored at 3.8V/cell (60% charged).
  • Do not expose battery packs to direct sunlight (heat) for extended periods.
  • When transporting or temporarily storing in a vehicle, temperature range should be greater than 8 degrees °C but no more than 40 degrees °C.
  • Storing LiIon batteries at temperatures greater than 40 degrees °C for extended periods of time (more than 2 hours) may cause damage to battery and possible fire.

Battery Care

  • Only charge a LiPo battery with a good quality Lithium Polymer charger. A poor quality charger can be dangerous.  Balancers are also recommended.
  • Set voltage and current correctly (failure to do so can cause fire).
  • Please check pack voltage after the first charge.

For example; a 4 Cell battery should measure 16.8V (16.6 to 16.84).

  • Do not discharge a battery to a level below 2.5V per cell under load. Discharging below 2.5V per cell can deteriorate battery performance. Be sure to set your ESC for the proper cut off voltage.
  • Use caution to avoid puncture of the battery. Puncturing a LiPo battery may cause a fire.

Operating Temperature:

  • Before flight: 8 to 40 degrees °C
  • Charge: 8 to 40 degrees °C
  • Discharge: 8 to 40 degrees °C

Always allow a battery to cool down to ambient temperature before re-charging.

During discharge and handling of batteries, do not exceed 40 degrees.

Battery Life

Batteries that lose 20% of their capacity must be removed from service and disposed of properly.

Discharge the battery to 0V/Cell, making sure output wires are insulated and then wrap battery in a bag for disposal.

Battery Emergency Procedures

In the event of a battery swelling, conduct the following:

  • Cease charging immediately
  • Disconnect terminals
  • Completely Discharge Battery to 0.0V/Cell
  • Using wire cutters, cut terminals off battery
  • Submerge batteries in a solution of salt and water for 1 hour
  • Empty water following applicable waste management procedures
  • Dispose of batteries following applicable waste management procedures.

In the event of a battery fire, conduct the following:

  • If safe, isolate power to battery
  • Segregate battery from flammable surrounds, preferably in bucket of sand or LiPo bag.
  • Control fire using fire extinguisher
  • Dispose of batteries following applicable waste management procedures.

Goshawk – System Components

Equipment Checklist

Additional Equipment – Ground Station:

  • Aircraft (with all on-board equipment in place and functioning properly)
  • Aircraft battery pack (charged)
  • GCS Laptop (charged)
  • Antenna, and power cables
  • Peripheral interface equipment (mouse)

Avionics Block Diagram

The autopilot system can be divided into either airborne components or ground station components. The airborne components are referred to as the avionics. The avionics consist of the autopilot, GPS, RC receiver, and digital modem. Figure 5 shows avionics block diagram.

Figure 5: Aircraft System Architecture

Air Vehicle

The Fixed Wing airframe is the casing that holds all of the system components. It is powered by four electric motors. The electric motors are powered by a Lithium Polymer (LiPo) battery.

The aircraft has the following characteristics:

ItemV-TOL GosHawk™
Airframe
Maximum Take-Off Weight3.8 kg
Cruise Speed at Sea Level30 kts
Rate of Climb at Sea Level500fpm
Take-Off Distance50m
Landing Distance120m
Stall Speed20 kts
Endurance120 Minutes*
Battery2 X LiIon 4S 10500mAh
Engine
ManufacturerTurnigy
ModelAerodrive SK3 700KV
Max Current45A continuous
Max Engine Power665 Watts
Length49 mm
Outside Diameter37 mm
Weight177 grams
Output Shaft Diameter5 mm
Propeller
ManufacturerAPC Pty Ltd
ModelLP12080E
Type2 Blade
Diameter304.8 mm
Pitch203.2 mm
Max RPM12,000
* With 15% reserve, subject to battery being maintained correctly, weather, and mission parameters.

Operating Limitations

The standard V-TOL GosHawk™  is recommended for day VFR and IFR operations. An optional package is available to allow night operations once CASA approval is obtained. This package consists of additional lights and equipment.

Max Manoeuvring Speed(Va) 40
Never Exceed Speed(Vne) 60
Max Cruising Speed(Vc) 45
Stalling Speed(Vs) 20 in cruise configuration
Crosswind Limits20kts

Service Ceiling

CASA Allowed400ft
Notional8,000ft

Climate/Environmental Restrictions

Max Ambient Operating Temp48°C
Flight into known bad weather conditionsProhibited
Max wind speed25kts
Flight into moderate to heavy rainProhibited

Goshawk – Background

An autopilot is in reality a dedicated microprocessor that executes a pre-set program.

Understanding that the autopilot simply follows a pre-set program necessarily means that the onus is on the operator to understand how the program works. This manual describes how to prepare the aircraft for flight.

This guide is not intended for the inexperienced, and assumes a basic level of familiarity with both the equipment and the principles and requirements for autonomous flight.

This guide has been designed to provide step-by-step instruction for equipment and ground operations specific to the Fixed Wing platform.

Goshawk – Safety

The first priority of anyone involved with unmanned aircraft is:

Safety!

Accidents can – and do – happen! It is the duty of everyone associated with unmanned aircraft to be mindful of the risks to persons, property and the aircraft, and to take all necessary actions to minimise those risks. Unmanned aircraft contain hazardous components, charged batteries, and spinning propellers, all of which represent a risk, not only to the pilot, but also to people in near proximity!

Symbology

Throughout this document the following symbols have been used:

This symbol identifies a point of note. The information presented is considered important and something that the reader should be aware of.

This symbol identifies a warning. Take note of the information presented as if it is n not observed and the procedure or action is not carried out as directed there is a real possibility of possible harm or damage to persons and/or property. This symbol usually accompanies a description on how to do something.

This symbol identifies a hazard or critical factor. This symbol is used when there is a real and possible risk to persons and/or property.

Pay particular attention to the warnings contained in this manual. These warnings relate to real and present hazards, and include suggestions on ways to mitigate these hazards to an acceptable level.

Safety Warnings When Handling Powered Aircraft

The following must be observed in order to maintain the safety of personnel, equipment and property:


When powered, always assume that the aircraft is ARMED.
Consider safety of personnel and surrounding environment when dealing with a powered aircraft.


  • Disconnect the ESC(s) from motor(s) and power cable(s) when working/maintaining aircraft for extended periods. This is to avoid damage to equipment and mitigate harm to personnel.
  • Avoid soft rebooting of the autopilot while the flight battery is attached. In some situations, the timer outputs can become corrupted, causing the motors to unexpectedly start.
  • Avoid connecting the Autopilot’s USB interface while the aircraft is powered.

NEURON GCS incorporates an ARM and SAFE mode. When the aircraft is connected to NEURON, these modes can be set using the ARM and DISARM buttons located at the top right-side of the software’s MFD-style interface. These buttons are illustrated below.

ARMEnables/Arms throttle control on UAV.

Will be greyed out if: UAV is NOT connected; orUAV is already ARMED
DISARMDisarms throttle control on UAV.

Will be greyed out if: UAV is NOT connected; orUAV is already DISARMED

As noted in the table illustrated above, both buttons will be greyed-out if the aircraft is not connected to Neuron GCS:

  • When connected, the [DISARM] button will remain grey-out if the aircraft is already disarmed; at this state, the [ARM] button will be coloured, and ready to arm motor(s).
  • Else, the [ARM] button will remain grey-out if the aircraft is already armed; in this state, the [DISARM] button will be coloured, and ready to disarm motor(s). 

WHEN ARMED IN SEMI-AUTONOMOUS (NAV) CONTROL, THE MOTOR MAY START AT ANY TIME.

WHEN ARMED, THE MOTOR MAY ALSO START, SHOULD THE THROTTLE CONTROL ON THE RC TRANSMITTER BE MOVED – EITHER ON PURPOSE OR ACCIDENTALLY!

Never pick up the aircraft and the radio controller at the same time. It is very easy to bump the throttle and inadvertently cause the motor to start spinning.

Never fly with a battery that has a low state of charge. This may lead to a crash.

WHEN THE WORD ‘ARMED’ APPEARS IN THE PFD; OR IF THERE IS NO WORD IS DISPLAYED – THE AIRCRAFT MOTOR(S) IS/ARE IN ARMED STATE.

Figure 1 (a) ARMED displayed on PFD, indicating aircraft motor(s) is/are set in an armed state.
Figure 1 (b) After the 10 seconds, the word ‘ARMED’ will no longer be displayed on the PFD.

‘SAFE’ will be displayed in the PFD to indicate that the aircraft is in a disarmed state, and safe to handle without risk of motor spin-up.

Figure 2, SAFE displayed on PFD, indicating aircraft motor(s) is/are set in a disarmed state.

Goshawk – Document Control

This record of revisions contains all changes made to the V-TOL Pty. Ltd. Goshawk Flight Manual. Changes to this manual are listed in the following table. Ensure all Goshawk Flight Manual copies at all locations are updated, with superseded pages removed and replaced as required and old pages taken out of usage as applicable.

Revision NumberSection RevisedRevision Issued DateRevised By
1.0Initial Issue29/10/2015Andrew Rieker
2.0Revised Neuron Operations14/04/2016Luke Horwood + Andrew Rieker
3.0Neuron GCS Upgrade30/05/2016Luke Horwood
3.1Setup Procedure and Emergency Procedures26/07/2017Andrew Rieker
3.2Update Aircraft Assembly Procedure26/03/2018Andrew Rieker
3.3Review23/03/2020Joe McGee

Neuron GCS – Settings

Figure 61 – Settings menu to access initial and advanced system settings

The Settings page provides access to three menu options as shown in Figure 61.

Do not attempt to adjust system parameters without a firm understanding of the system’s operational requirements. Please consult the respective system’s operation manual or contact the manufacturer before any adjustments are made!
Adjusting unprescribed parameters WILL void your warrantee!

Initial Setup & Configuration

This subsection provides a means to up and configure the system’s autopilot, as well as to prepare it for use with the specific UAV. Typically, these sections are “must do” actions that are required before the UAV can be flown safely and should have already been configured for your aircraft on delivery.

What you see when you enter this section depends on whether or not you are connected. Each menu item will bring up a new screen:

  • Install Firmware: Allows for the onboard firmware of the autopilot system to be installed and managed.
  • Mandatory Hardware: You will see this menu item if the autopilot is connected. Click this menu item to see the items you must setup before you attempt to operate your vehicle.
  • Optional Hardware: This submenu allows the configuration of optional devices, many of which can be configured through the autopilot system. Some of these options are able to be configured without a live connection to the autopilot. Also, this submenu has a Motor Test function allowing you to test direction and order of the system.

Please refer to the associated maintenance manual for your system for more information regarding the initial setup and configuration of that specific UAV.

Advanced Settings

This subsection allows for the system to be fine-tuned directly through parameter access to the Neuron GCS and the connected autopilot Most of these parameters are set for you when you first install your firmware but some may be needed to be configured depending on the specific use cases for the UAV system.

What you see when you enter this section depends on whether or not you are connected. Each submenu item will bring up a options display:

  • Planner: Allows configuration for settings related to Neuron GCS, such as enabling speech, where the logs are saved, interface options, and other program behaviour settings.
  • Parameters available if connected:
    • Flight Modes: You will see this menu item if the auto pilot Is connected. Here is what you can do in this section TBD
    • GeoFence: Allows the enabling or disabling of geofence (refer to Section 9.5).
    • FailSafe: Access to setting various Failsafe options depending on autopilot functionality (refer to UAV operations manual), such as PPM Throttle Failsafe, PPM GCS Failsafe, and Battery Failsafe.
    • Controller Tuning: Access to setting various flight control and PID tuning for the autopilot (refer to UAV operations manual).
    • Standard & Advanced Parameters: Access to setting various operational parameters for the connected autopilot that allow adjustments to be made within reasonable margins (refer to UAV operations manual).
    • Full Parameter List/Tree: Allows a direct interface to the onboard parameters of the autopilot system. This subsection provides options to download and save parameters for your vehicle, as well as reloading previous backups from file. In addition, the presented parameter items can be adjusted directly, however parameters entered in this manner are not “sanity checked” to ensure safe operational constraints.

Exit Neuron GCS

This will close Neuron GCS, saving any changes made to the application settings or view setups.

Neuron GCS – Data Management

The data management window offers a method to create or modify the automatically compiled flight summary (which is generated as part the Checklists in Section 7).

Figure 60 – Data Management Page

Flight summaries can be imported using the Import Flight Summary button. Values for this can then be adjusted as per the users needs. Modifications such as adding or removing flight cycles can be performed.

Once the adjusted flight summary meets the needs of the modifications, it can be exported as the same flight summary file or as a new flight summary.